Welcome to the world of deer taxidermy mastery, where we unlock the secrets to turning your hunting trophy into a timeless work of art.
The art of deer skull preparation requires precision, dedication, and a touch of creativity.
In this comprehensive guide, we show you how to transform your prized deer skull into a stunning European mount, all while ensuring it remains preserved for generations.

We will start off with a quick overview of what boiling a deer skull entails.
Then we will explore our favorite compounds to add to water when boiling deer skulls.
Finally we will run you through every step in the process to highlight exactly when to add which compounds and for how long.
Let’s embark on this exciting journey to preserve your trophy in the most magnificent way possible.
Overview of Boiling a Deer Skull
Picture this: Your latest hunting trophy, the majestic deer skull, poised proudly on display for all to admire.
But before you reach that moment, you must understand the intricate process that lies ahead. It’s not just about aesthetics; it’s about preserving the integrity of the bones involved.
At its core, deer skull preparation is an art form. It’s about transforming a once-in-a-lifetime moment into a permanent masterpiece.
Each step in this journey, from boiling a skull to mounting, plays a crucial role in the grand scheme of taxidermy.
Why is this process so important? When done right, it immortalizes the success of the hunt, allowing you to share the story with friends and family.
It requires attention to detail, patience, and a touch of craftsmanship.
Best Things to Put in Water When Boiling Deer Skulls
We are now going to go through our favorite things to add (and one you shouldn’t) to the water when boiling skulls.
They are:
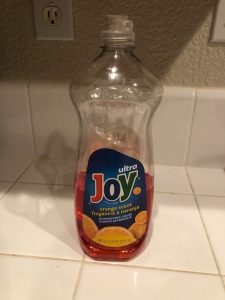
- Dish Soap
- Baking Soda
- Soda Ash
- Hydrogen Peroxide
Dish Soap
One common practice involves adding dishwashing soap detergent to the boiling water. This approach has garnered attention for its potential benefits, but it’s essential to understand both the advantages and potential drawbacks before incorporating it into your taxidermy process.

Benefits:
- Degreasing: Dishwashing soap is highly effective at breaking down and emulsifying fats and oils. When added to the water, it aids in degreasing the skull, ensuring that it’s thoroughly clean. This is especially crucial for achieving that pristine, bone-white finish that many taxidermists desire.
- Cleaning: The detergent’s cleaning properties help remove stubborn residues, such as blood or tissue, from the skull’s crevices. It enhances the overall cleanliness of the skull, a vital step in the taxidermy process.
- Stain Removal: Dish soap detergent can help remove stains or discolorations from the bone’s surface. This is particularly valuable when dealing with older or weathered skulls.
Considerations:
- Residue Removal: While dishwashing soap is excellent at cleaning, it can leave behind a soapy residue on the skull. To mitigate this, thorough rinsing and additional cleaning may be necessary after you boil to ensure the residue is entirely removed.
- Aroma: Some individuals may find that the use of soap in the boiling water leaves a faint, lingering scent on the skull. If this concerns you, ensure thorough rinsing and drying to minimize any residual odor.
For what it is worth, dawn detergent works great.
Baking Soda

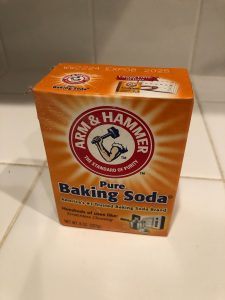
Baking soda is one of the mostly commonly used cleaning agents when boiling the skull of a buck. In our experience, it works very well.
Benefits:
- Degreasing: Baking soda is effective at breaking down fats and oils, making it a valuable tool for degreasing the skull. It helps remove residual tissue and fat, ensuring a cleaner and whiter result.
- Odor Reduction: It has natural deodorizing properties. When added to the boiling water, it can help neutralize any lingering odors associated with the skull, improving overall scent control.
- Whitening: Baking soda can contribute to the whitening process, helping achieve the coveted bone-white finish many taxidermists aim for.
Considerations:
- Residue: One potential drawback is that it may leave a fine white residue on the skull’s surface. To address this, thorough rinsing and additional cleaning may be required after boiling.
- Texture Alteration: Prolonged exposure can affect the texture of the bone, making it slightly more porous. While this might not be a concern for most mounts, it’s worth noting.
Soda Ash
- THE PERFECT SOLUTION: Whether you’re looking for a natural and non-toxic way of increasing pH levels of your swimming pool water, you want to get rid of those nasty greasy stains on your favorite t-shirt, or you work in the fabric dyeing industry, the Cesco Solutions Soda Ash is a must.
- PREMIUM QUALITY INGREDIENTS: Our soda ash is made with finest quality, non-toxic and 100% biodegradable ingredients, naturally stabilizing alkaline levels and increasing pool pH levels.
- DYE FIXER: Sodium carbonate acts as a textile fiber molecule activator, changing the pH of the dye and cellulose fiber, which makes it the ideal dye fixer, ensuring that the dye properly bonds with the fabric.
Soda ash, also known as sodium carbonate, is a versatile alkaline compound utilized in various applications, including deer skull preparation. When added to the boiling water, it serves as a powerful cleaning agent, effectively aiding in the degreasing and cleaning process.
Benefits:
- Degreasing: Soda ash is exceptionally effective at breaking down fats and oils, making it an excellent choice for thorough degreasing of the skull.
- Cleaning: Its alkaline properties enhance cleaning by removing tissue and other residues, resulting in a cleaner and whiter skull.
Considerations:
- Caution with Concentration: While it is a potent cleaner, it should be used in the appropriate concentration. Excessive use can damage the bone’s structure.
- Residue and Texture: Like other additives, it can leave a residue on the skull’s surface. Thorough rinsing and cleaning are essential to avoid any undesirable texture or appearance alterations.
At first glance, you may think it looks similar to baking soda, but there are some important differences.
Soda ash and baking soda are two different chemical compounds with distinct properties and uses:
- Soda Ash (Sodium Carbonate):
- Chemical Formula: Na2CO3
- Alkalinity: Highly alkaline
- Common Uses: Primarily used in industries such as glass manufacturing, chemical processing, and water treatment. It is also used in some cleaning products.
- Properties: It is a white, odorless powder that dissolves easily in water. It is a strong alkaline substance and can be corrosive in concentrated form.
- Degreasing: Sodium carbonate is used in taxidermy and skull cleaning for its degreasing properties. It effectively breaks down fats and oils, making it useful in the preparation of animal skulls.
- Baking Soda (Sodium Bicarbonate):
- Chemical Formula: NaHCO3
- Alkalinity: Mildly alkaline
- Common Uses: A common household item and is used in cooking, baking, cleaning, and as an antacid. It is also used for various personal care and medicinal purposes.
- Properties: It is a white, crystalline powder with a slightly salty taste. It is a gentle alkaline compound and is safe for human consumption in moderate amounts.
- Skull Cleaning: Baking soda is sometimes used in taxidermy and skull cleaning for its cleaning and deodorizing properties. It can help remove residues and odors from bones.
Hydrogen Peroxide
Hydrogen peroxide (H2O2) is a common choice for both boiling and bleaching a skull in the taxidermy and skull cleaning process. It offers several benefits but also comes with potential dangers that require careful consideration.
Benefits:
- Whitening: Hydrogen peroxide is renowned for its exceptional whitening properties. When applied correctly, it can leave the skull bone-white, making it a popular choice for taxidermists seeking a pristine finish.
- Disinfection: Peroxide possesses mild antiseptic properties, which can help disinfect the skull during the cleaning process, reducing the risk of lingering odors or bacteria.
- Versatility: It can be used in various concentrations and methods, making it adaptable to different skull cleaning techniques.
Potential Dangers:
- Concentration: Hydrogen peroxide is available in different concentrations, ranging from 3% (common household use) to much higher levels used for specific applications. Using a concentration that is too high can damage the bone, causing it to become brittle or discolored. Always dilute it as necessary.
- Over-bleaching: Prolonged exposure or excessive use of hydrogen peroxide can lead to over-bleaching, resulting in a chalky appearance and weakened bone structure.
- Safety Precautions: It is a corrosive substance that can irritate the skin and eyes. When working with it, wear appropriate protective gear, including gloves and goggles, and ensure good ventilation.
- Rinsing: After bleaching, thorough rinsing is essential to remove any residual peroxide, as it can continue to react and potentially harm the bone or discolor it over time.
Now that we have covered some of our favorite cleaning agents, we’ll delve deep into the world of deer skull preparation. Gear up for an adventure in taxidermy artistry.
Safety Precautions
As you start preparing your deer skull, safety should always be your guiding star. You must prioritize your well-being and that of those around you.
Handling boiling water, cleaning chemicals, and sharp tools demands caution. Protective gear, such as gloves and safety goggles, should be your first step. Keep a well-ventilated workspace and always work in a controlled environment to minimize risks.
Equally important is the awareness of the chemicals you’ll use during the process. Some substances can be harmful if mishandled. Always follow manufacturer guidelines and recommendations.
This is an art form, and like any art, patience is key. Rushing through the process can lead to accidents.
So, take your time, work methodically, and don’t compromise on safety.
Materials and Equipment
Now that we’re on our way to transforming your deer skull into a stunning European mount, it’s time to gather the essential materials and equipment that will make this journey a success.
- Knives: Your trusty blades will be your artistic instruments. Make sure you have a sharp, reliable knife for precise work.
- Needle Nose Pliers: These can be really helpful for getting into tight spaces when removing all the meat from the skull.
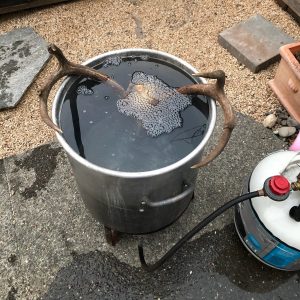
- Boiling Pot: You’ll need a pot large enough to accommodate the skull. It should be deep enough to submerge it completely.
- Water Source: Access to clean, preferably soft water is crucial for the boiling process.
- Protective Gear: Safety first! Equip yourself with gloves and safety goggles to shield against hot water and chemicals.
- Cleaning Brushes: Stiff brushes (wire brush) and toothbrushes are indispensable for scrubbing away tissue and debris.
- Whitening Agent: Consider a quality whitening compound, as this will play a significant role in achieving that pristine, white finish.
- Sealing Materials: Depending on your mounting choice, you might need epoxy, wood plaque, or other mounting materials.
- Well-Ventilated Space: Choose a workspace with good ventilation to avoid inhaling fumes.
Cleaning and Initial Prep
Now that we’ve gathered our arsenal of tools and equipment, it’s time to roll up our sleeves and embark on the first steps of this taxidermy masterpiece. The goal at this stage is to clean the skull completely.
Step 1: Removing Excess Tissue
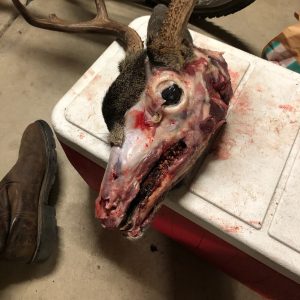
We must begin by removing any excess tissue from the entire skull. This includes flesh, hide, connective tissue, and hair that may still cling to the bone and brain cavity.

It is essential you get all the brain tissue, as gross as it might be.
A sharp knife is your trusty companion here. With precision and patience, carefully scrape away these remnants.
Step 2: Degreasing
Deer skulls naturally contain oils that can hinder the whitening process. To address this, you’ll need to degrease the skull. Soak it in a degreasing solution to dissolve and remove these oils. This step ensures that the whitening agent later on can work its magic effectively.
Step 3: Hydration
Just as a hunter understands the importance of staying hydrated during a hunt, your deer skull needs some hydration too. Submerge it in water for a period to ensure it regains some moisture lost during the cleaning process.
These initial steps set the stage for a successful deer skull transformation. With patience and precision, you’re well on your way to crafting a European mount that will become a treasured testament to your hunting prowess.
Water Preparation
Now that we’ve laid the groundwork for your deer skull transformation, it’s time to delve into an aspect that’s often underestimated: water preparation.
Just as a hunter studies their prey’s habits, understanding the water you use in this process is critical for success.
Clean, Soft Water Is Key
When it comes to boiling your deer skull, not all water is created equal. Clean, preferably soft water is your secret weapon.
Hard water, with its mineral content, can leave unsightly deposits on your prized trophy. So, opt for the purest water source available.
Consider Water Additives
Many seasoned hunters and taxidermists recommend adding specific substances to the boiling water. This isn’t just about achieving cleanliness; it’s also about enhancing the final aesthetics of your mount.
This is there step where you are going to want to add your dish soap, baking soda, or soda ash.
Each of these serves a unique purpose, from degreasing to achieving that pristine white finish.
With clean, well-prepared water, your European mount will truly shine as a testament to your hunting prowess.
Boiling the Skull
With your deer skull prepped and your water ready, it’s time for the heart-pounding moment—the actual boiling process.
Optimal Temperature and Duration
Like any skilled hunter, you need precision here. The water temperature should hover around a gentle simmer, not a rolling boil.
High temperatures can damage the bone, while lower temperatures may not achieve the desired results. Aim for that sweet spot where the water is hot enough to work its magic without causing harm.
The duration of the boil is equally crucial. You’re not aiming for a quick fix; it’s a slow and steady process. Depending on the size and condition of the skull, it will take at least an hour, possibly longer.
Keep a watchful eye and patience as your trophy undergoes its transformation.
Cooling and Cleaning
As your deer skull emerges from its hot water bath, it’s time to shift gears and transition into the next crucial phase—cooling and cleaning. This step is where the art of taxidermy starts to truly shine, like a hunter expertly field-dressing their game.
The Gentle Cool-Down
After you boil, it is time to cool down your deer skull. Avoid abrupt temperature changes, which can cause cracking or teeth can fall out. Let it cool naturally or use lukewarm water to aid the process.
Scrubbing Away the Past
Now comes the meticulous part—the cleaning. Armed with brushes and tools, you’ll delicately scrub away any remaining tissue or debris. This step is essential to achieve that pristine, bone-white finish.
This phase is where the magic happens.
Whitening and Bleaching
Having navigated through the earlier phases of skull preparation, you’re now ready to embark on the transformative journey of whitening and bleaching your deer skull.
Understanding the Significance
Just as a hunter respects the animal they’ve harvested, it’s essential to respect the integrity of the bone. The whitening and bleaching process isn’t just about aesthetics; it’s about preserving the bone’s structure and color.
Choosing the Right Whitening Agent
Selecting the right whitener is akin to choosing the perfect bullet for your hunt. Some opt for hydrogen peroxide, while others prefer more natural solutions like sunlight or mild acids. The choice depends on your preferences and the level of whiteness you desire. Ensure you follow safety guidelines during this process.
The Art of Bleaching
The artistry of taxidermy comes into play as you carefully apply the chosen whitener to your deer skull.
Much like a hunter relishing the fruits of their labor, the whitening and bleaching process reveals the true beauty of your deer skull.
With careful application and patience, you’re on the path to creating a masterpiece that tells the story of your hunting prowess for generations to come.
Just be careful not to get the bleach on the antlers.
Final Cleaning and Inspection
As you near the culmination of your deer skull preparation journey, it’s time for the ultimate phase – the final cleaning and inspection.
Thorough Inspection
Begin by carefully inspecting every nook and cranny of your deer skull. Ensure that all tissue and debris have been removed, leaving behind a clean canvas. A magnifying glass can be your ally in spotting any overlooked imperfections.
A Pristine Finish
Just as a hunter takes pride in their trophy, you’ll want your European mount to exude perfection.
Use brushes, toothpicks, or even compressed air to ensure every crevice is immaculate. This phase is all about the finer details.
Sealing the Deal
Depending on your mounting choice, you may need to apply a sealant to protect your hard work and add that final touch. This step not only ensures longevity but also enhances the overall aesthetics of your trophy.
With this meticulous final cleaning and inspection, your deer skull is transformed into a masterpiece.
Much like a hunter’s satisfaction after a successful hunt, you can now take pride in displaying your European mount, knowing that you’ve poured your skill and dedication into preserving the essence of your hunting prowess.
Sealing and Mounting Options
Now that your deer skull is a pristine work of art, it’s time to explore the final steps in your journey towards making beautiful European mounts – sealing and mounting. This phase is where your creativity as a taxidermist truly shines, similar to a hunter showcasing their trophy in a carefully chosen frame.
Sealing for Preservation
Before you decide on a mounting option, consider applying a sealant to the skull. This step not only enhances the aesthetics but also preserves your masterpiece for years to come.
Epoxy resin is a popular choice, offering durability and a glossy finish.

Exploring Mounting Choices
The classic choice is the European mount, where the skull is displayed on a wooden plaque.
Alternatively, you can opt for wall brackets or pedestal mounts, depending on your space and aesthetic preferences.
Wrapping Up
In the world of taxidermy, where art meets craftsmanship, your journey to transform a simple deer skull into a magnificent European mount is complete.
Just as a hunter relives the thrill of the hunt, your finished masterpiece tells a story—a testament to your hunting prowess and your artistic touch.
FAQs
What are the essential materials for boiling a deer skull?
The key materials include a sharp knife, a suitable boiling pot, clean water, protective gear (gloves and goggles), cleaning brushes, a whitener, and, depending on your mounting choice, sealing materials like epoxy or wood plaques.
How long should I boil a deer skull?
Boiling duration varies depending on the skull’s size and condition. On average, a few hours is a good starting point.
However, patience is crucial. Keep a close eye on the skull during the process, ensuring it’s simmering gently, not vigorously.
What can I put in the boiling water for a clean skull?
To achieve a clean skull, consider adding specific substances to the boiling water.
Baking soda, soda ash, dishwashing soap, or even hydrogen peroxide are common additives. Each serves a unique purpose, from degreasing to whitening.
Your choice can significantly impact the final result.
Can I use household bleach for whitening?
While some taxidermists do use household bleach, it’s essential to exercise caution.
Bleach can be harsh on bone and may lead to damage if not used correctly. There are alternative whitening agents designed for taxidermy, offering safer and more controlled results.
Are there any safety concerns when working with deer skulls?
Absolutely. Safety should be a top priority. Handling boiling water, cleaning chemicals, and sharp tools requires caution.
Always wear protective gear, work in a well-ventilated area, and follow safety guidelines when handling chemicals. Rushing through the process can lead to accidents, so take your time and prioritize safety.
